
You did it! You built an app.
Imagine this: You click "Publish," and within hours, strangers all around the world have downloaded your app. Your notifications light up, your concept is out there, and your dream is finally coming true. Sounds amazing, right?
That’s the magic of the Google Play Store. It's a free pass to reach billions of Android users ready to try what you've built.
Good news: It’s not rocket science (thankfully). All you need is a clear, simple guide, and that’s exactly what you’re about to get. This guide is your step-by-step plan for uploading your app to the Play Store like a pro. No fancy tech talk. No endless confusion.
Whether you’re a student, a business owner, or just someone with a big idea, your app deserves more. Let’s hit that Publish button and share your creation with the world.
The Value of Publishing Your App on the Google Play Store
Android controls more than 70 percent of the global mobile market. It has around 4.2 billion monthly active users around the world. This means a large number of people use Android devices every day.
Because of this, publishing your app on the Google Play Store can help you reach a global audience. Your app becomes visible to users from many different countries.
When you upload your app to the Play Store, it gets global distribution. People can easily find and download your app from anywhere in the world.
The Google Play Store also works like a search engine for mobile apps. If your app listing is properly optimized, more users may find your application.
This can bring organic downloads without spending much money on marketing.
Another important factor is trust and security. Many users feel more comfortable installing apps from the Play Store.
They trust the platform, so they also trust the apps available there.
Publishing your app on the Play Store also makes updates easier.
You can quickly fix bugs, release updates, and add new features. Users will receive the latest version of your app without difficulty.
There are also monetization opportunities. Developers can earn money through ads, subscriptions, or in-app purchases.
These are some of the key benefits of publishing your app on the Google Play Store. It helps you reach more users, build trust, and manage your application easily.
What You Need Before Uploading Your App?
Before you upload your app to the Google Play Store, make sure you have these essentials ready:
- Google Play Developer Account - A one-time $25 account for publishing your app.
- Signed App Bundle (AAB) or APK – A properly signed release file ready for upload.
- Unique App Package Name (Bundle ID) - Your app's unique identity.
- App Details & Visuals - Include a title, description, screenshots, and an app symbol with your listing.
- Privacy Policy Link - A basic document that describes how user data is handled.
Once you’ve checked all these off, you’re ready to move on to submit your app on Google Play!
Step-by-Step Guide to Submit Your App To the Google Play Store
Publishing your app on the Google Play Store might be difficult, but it's a simple process when broken down into simple steps. Follow this guide and your app will be live in minutes!
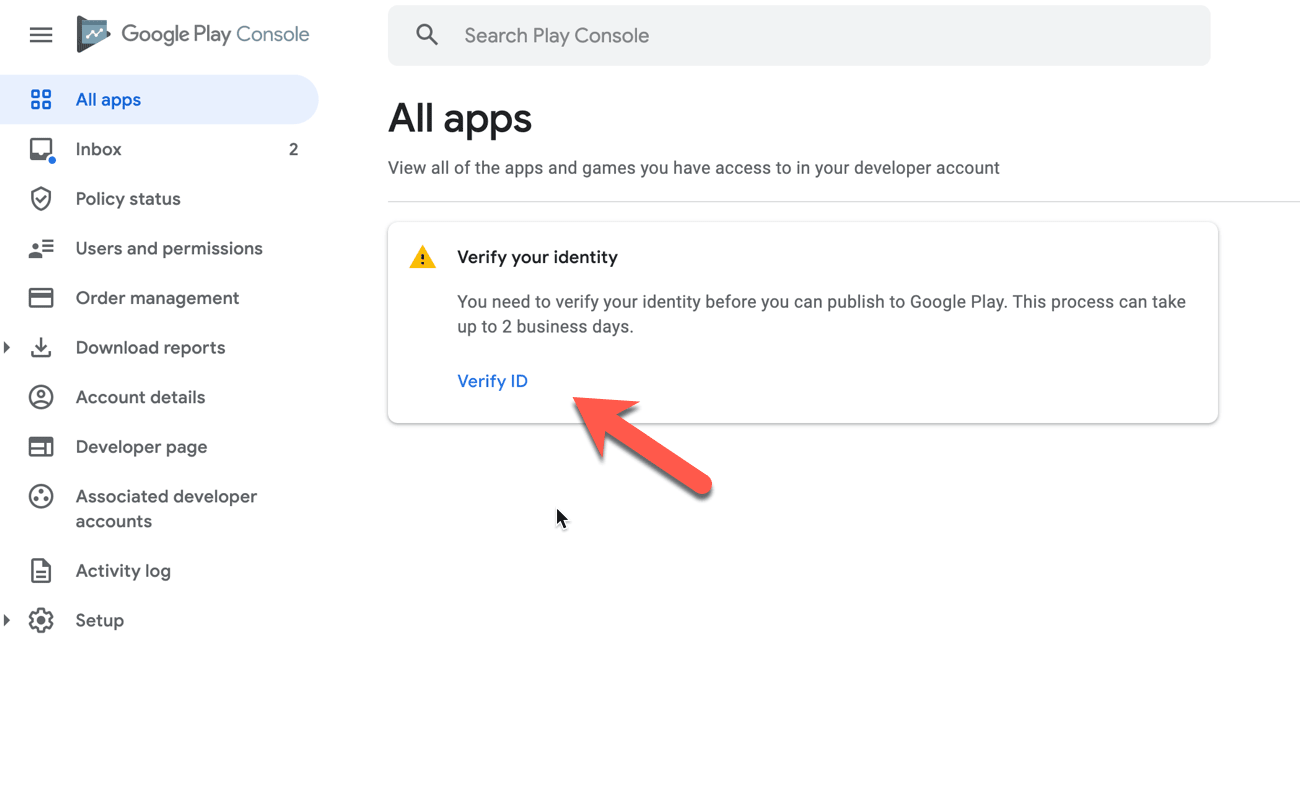
Step 1: Create Your Google Play Developer Account
To launch your apps, you'll need a Google Play Developer account (Google Play Console)
- Join in with your Google account.
- Accept the Developer's Agreement.
- Pay a one-time $25 registration fee.
- Complete your developer profile with basic information.
Once this is done, you’ll have full access to the Google Play Console, your app publishing hub.
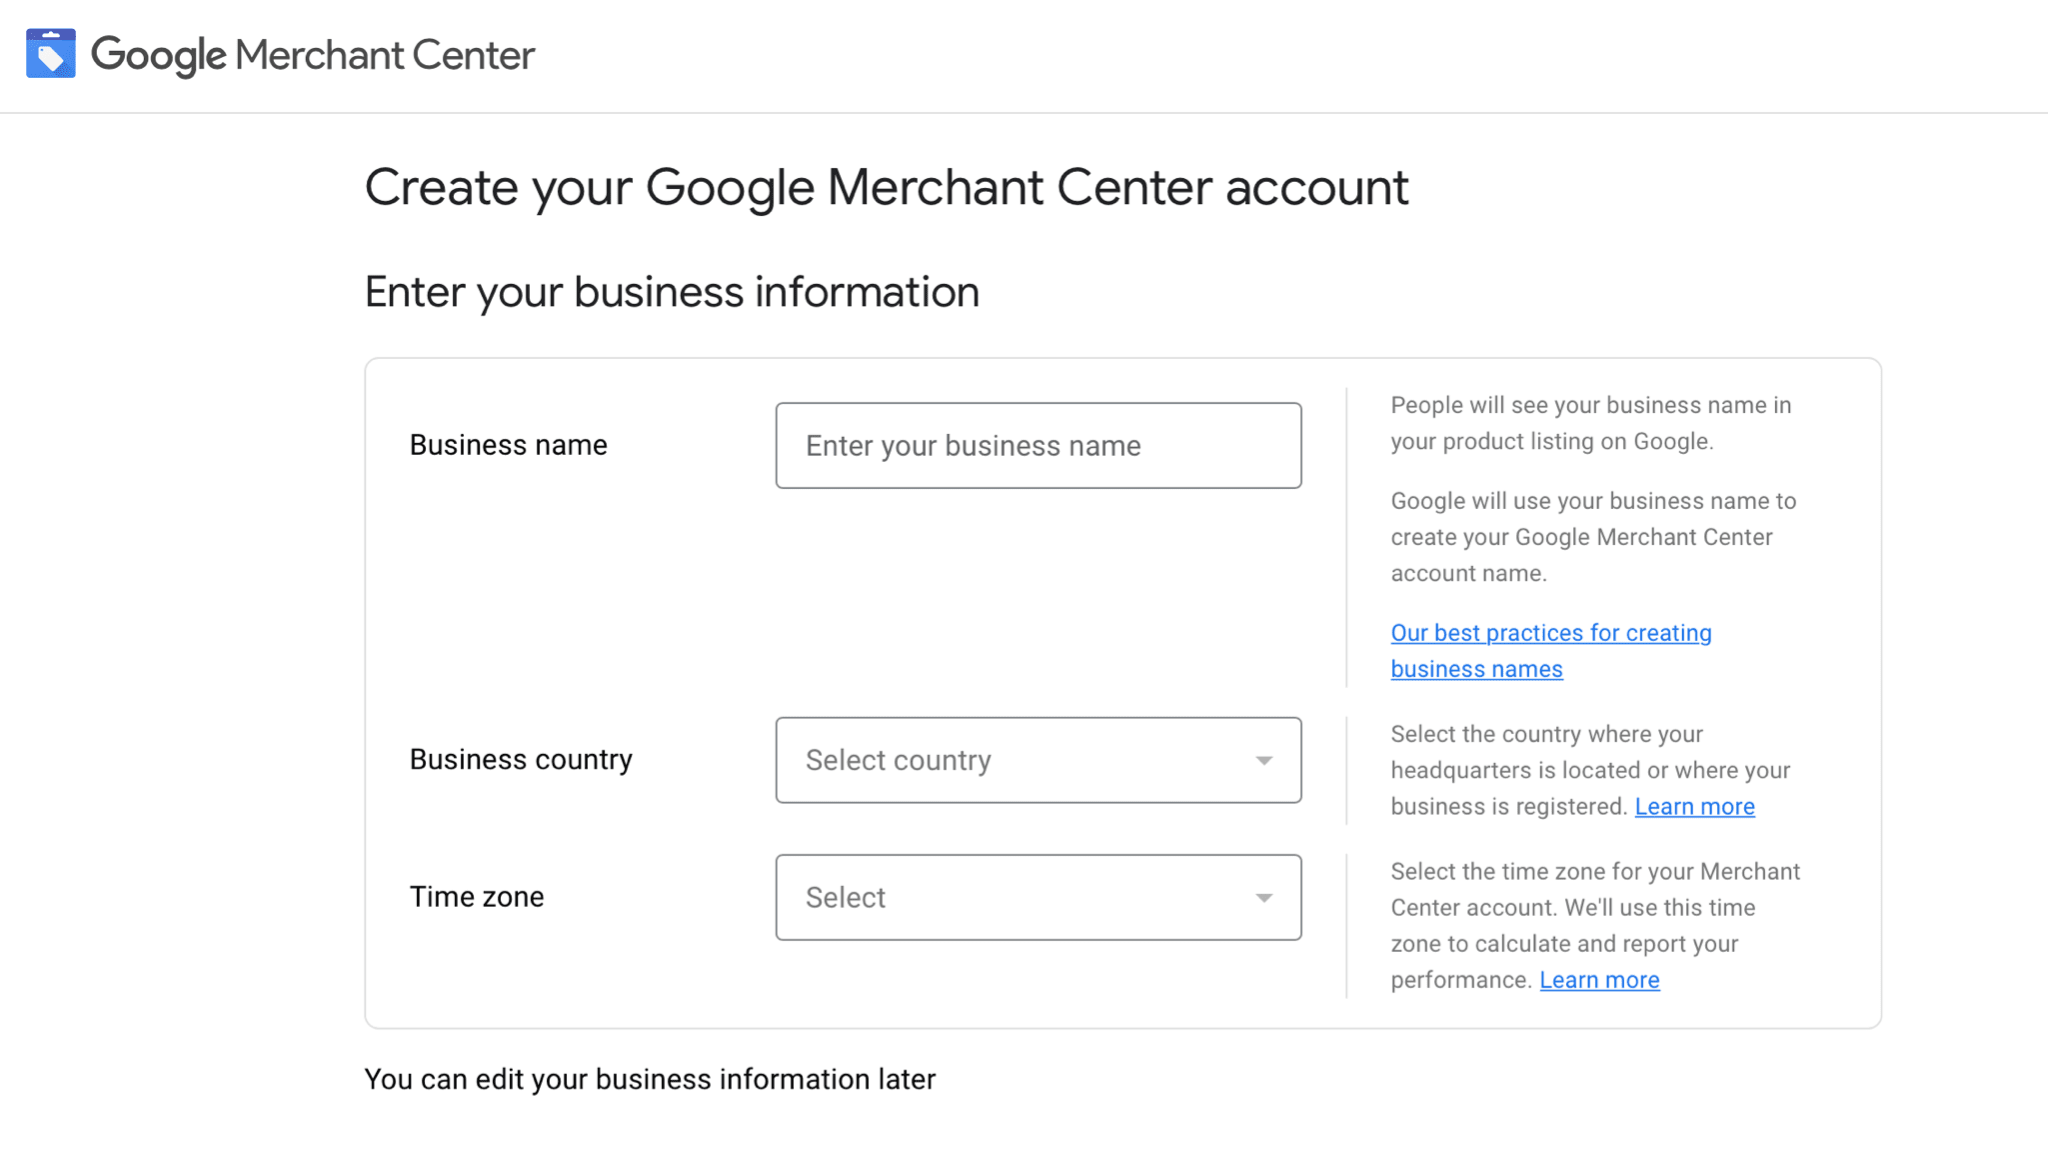
Step 2: Set Up a Google Merchant Account
If your app offers premium features or in-app purchases, create a Merchant Account to collect payments:
- Log in to your Play Console.
- Go to Reports → Financial Reports → Set up a Merchant Account now.
- Add your business details and link it to your Developer Account.
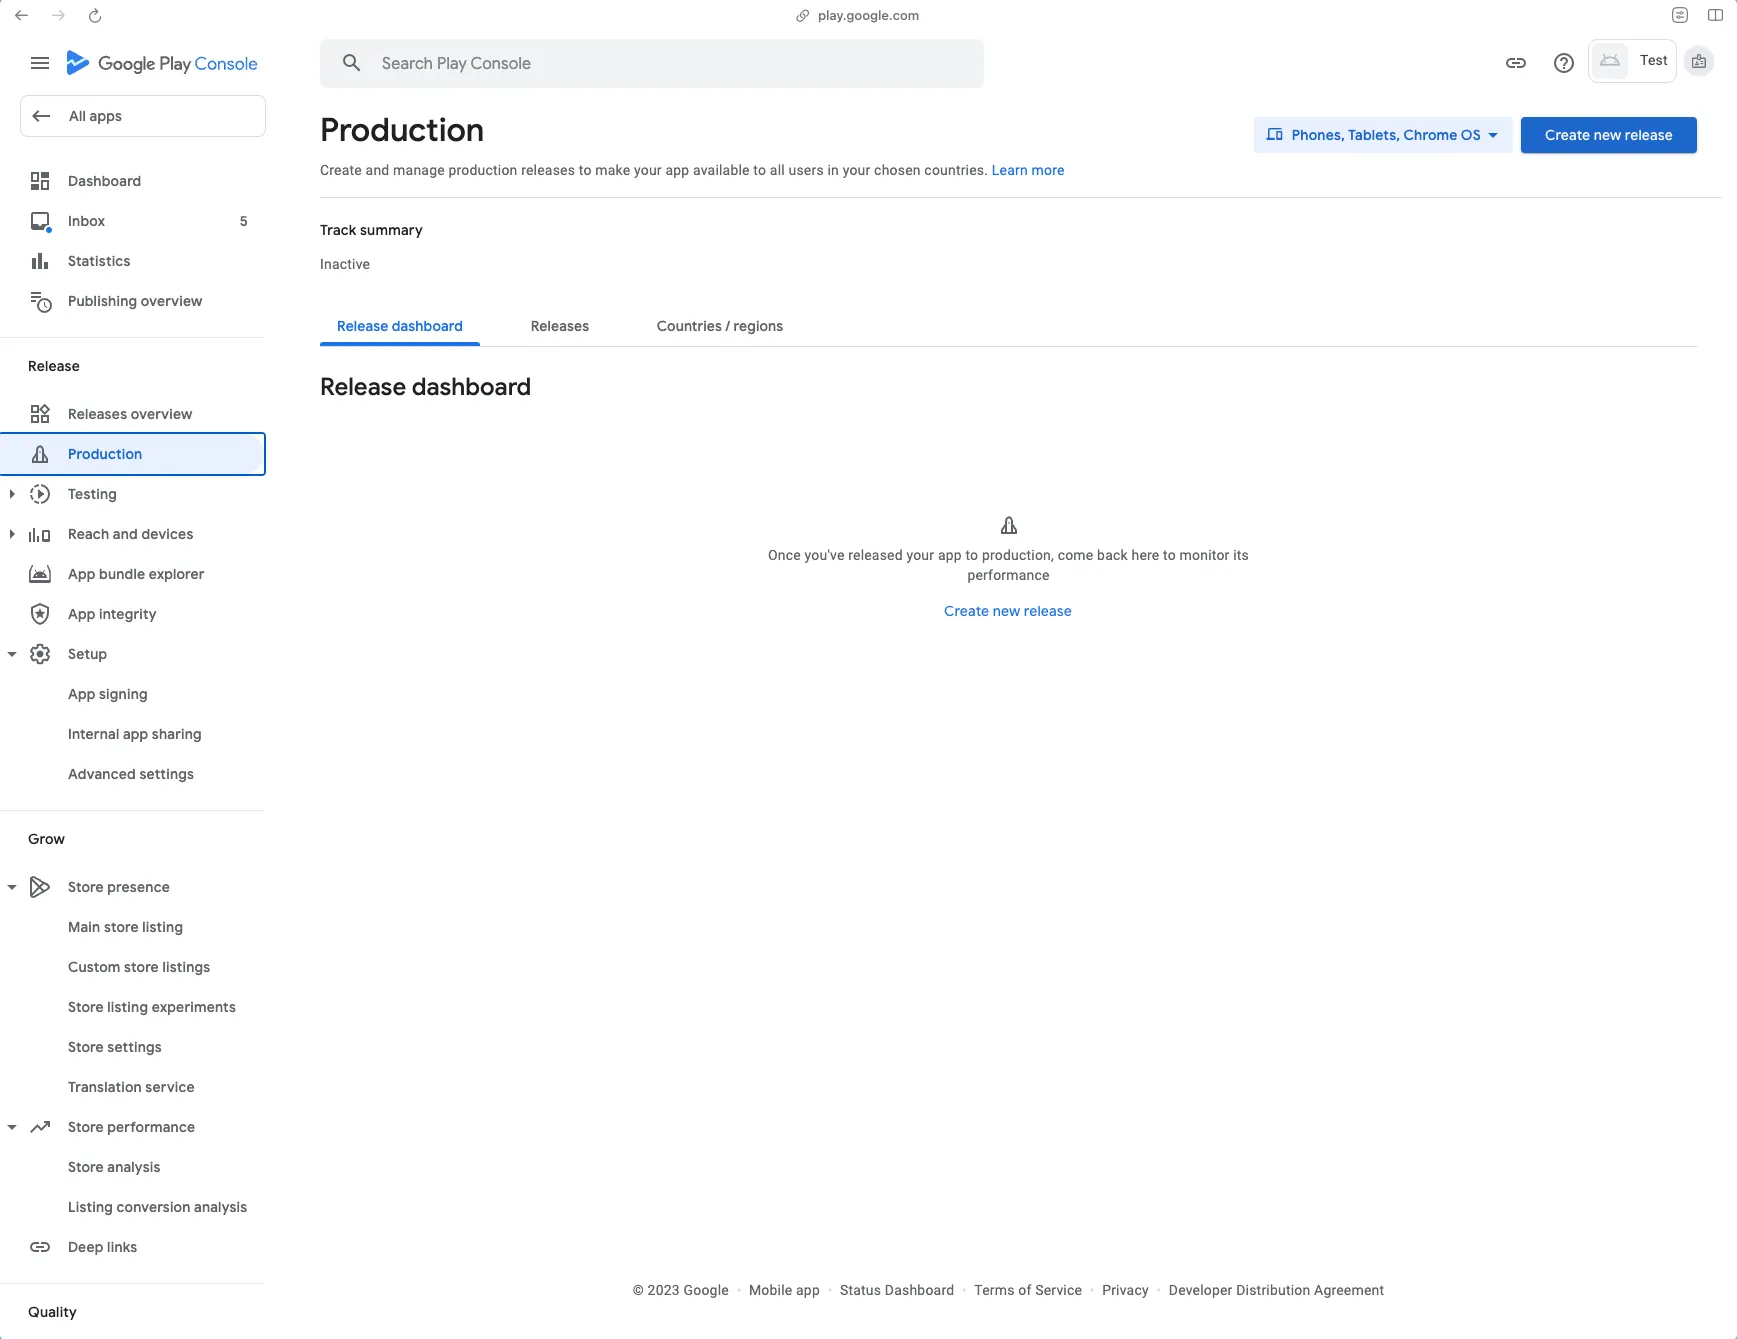
Step 3: Upload Your App File (APK or AAB)
Now, submit your app to Google Play.
- Open Google Play Console and go to App Releases.
- Decide how you want to release it.
-> Internal Testing: Small group testing.
-> Closed test: Limited audience testing.
-> Open test: Public testing.
-> Production: Launch is open to everyone.
- Click Create Release.
- Drag & drop your AAB or APK file, or upload it directly from your PC.
- Save your changes.
Test with a small group first to find bugs before going live.
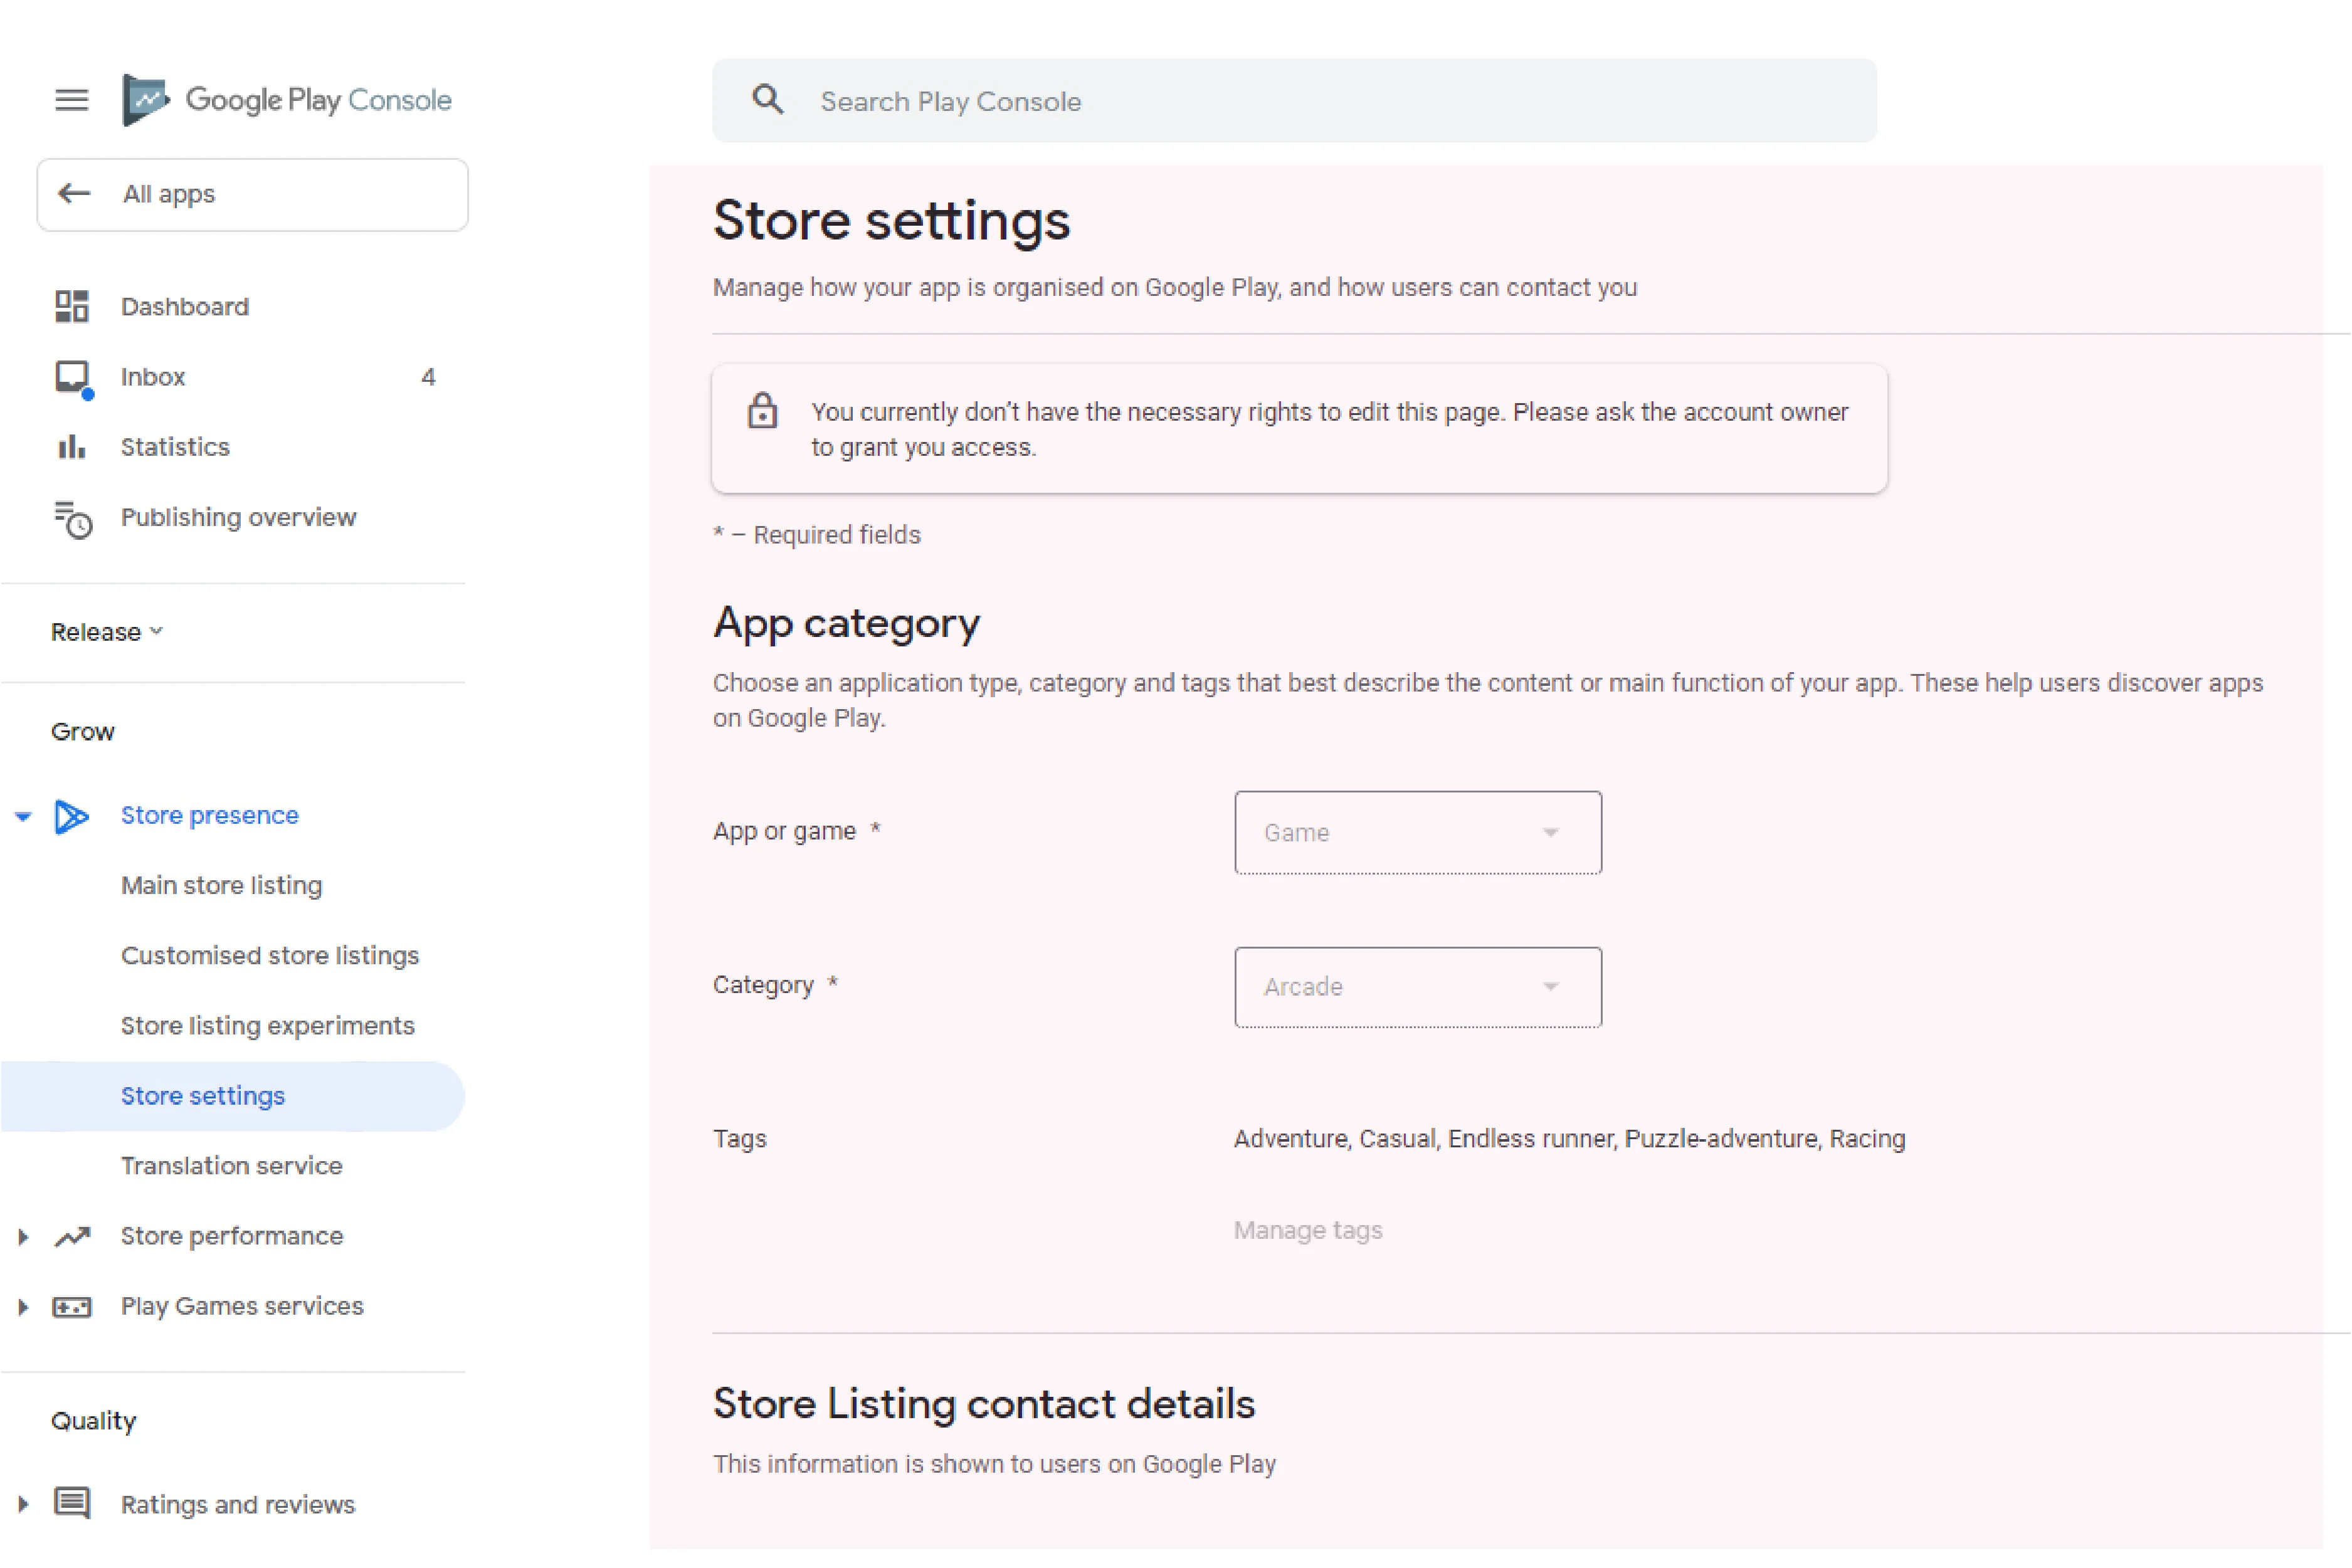
Step 4: Create Your App Store Listing
This is where you present your app to users. Add:
- App Title and Short Description: Clear, keyword-rich overview.
- Full Description: Explain your app's features, purpose, and target audience.
- Visuals: Upload a high-quality logo, screenshots, and an optional promo video.
- Category: Select the correct app type and category.
- Contact Information: Provide a support email (phone is optional).
- Privacy policy URL: Maintain transparency around data consumption.
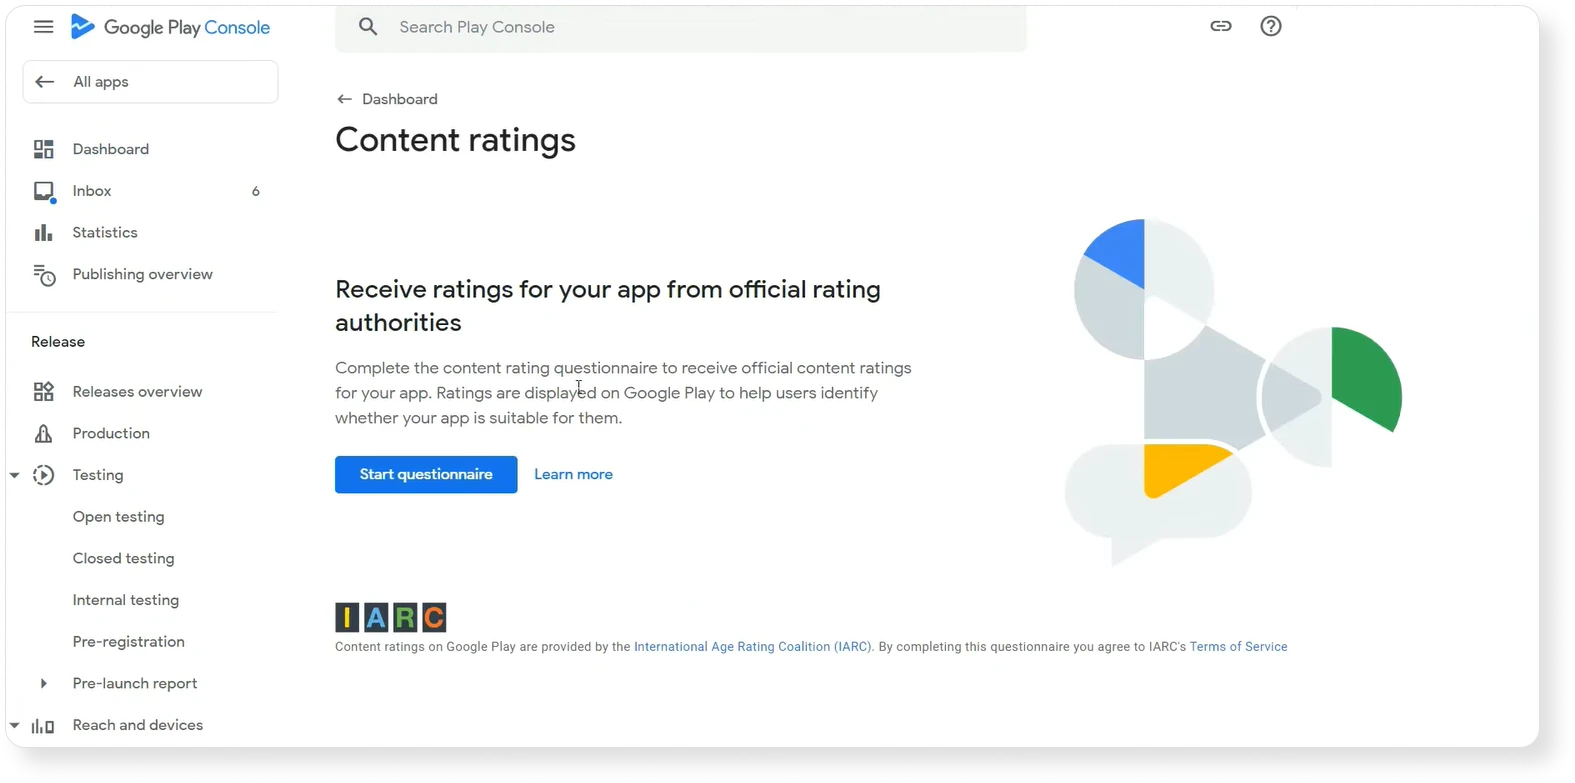
Step 5: Set Content Rating
Google needs a content rating to ensure that your app is visible to the right audience.
- In Play Console, go to Store Presence → Content Rating.
- Fill out the questionnaire honestly to prevent rejection or removal.
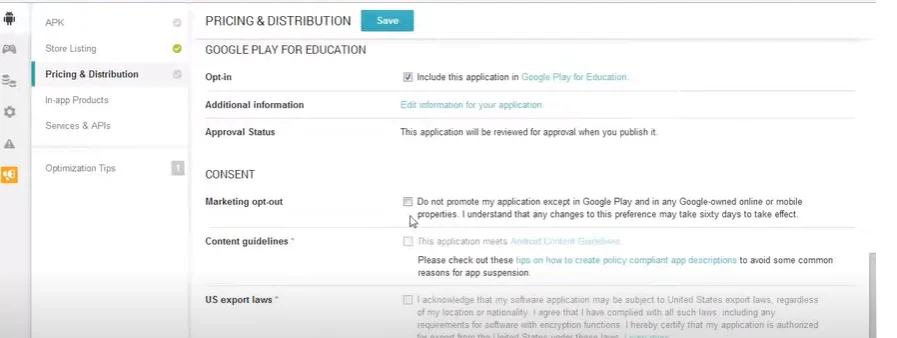
Step 6: Choose Pricing & Distribution
Decide how your app will be offered.
- Free or Paid: You may always change from paid to free later.
- Target Countries: Choose where your software will be available.
- Device compatibility: Select Android programs and supported devices.
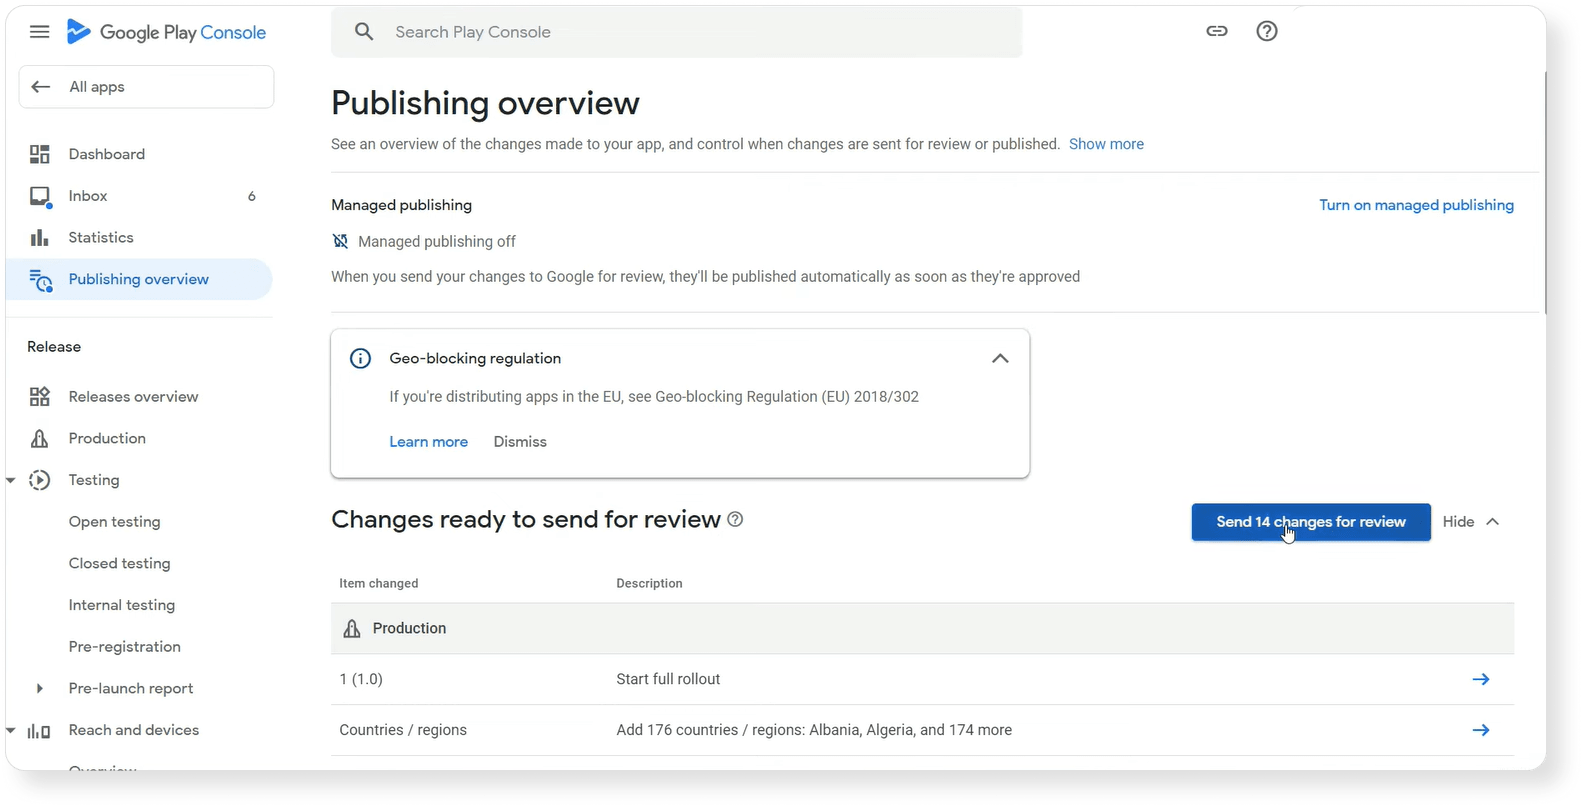
Step 7: Review & Publish
You're almost done!
- Double-check all data, including the app file, images, descriptions, price, and policies.
- Click Publish.
- If there are errors or warnings, fix them. If not, your app is live!
Want expert help with your app launch? Contact us today for a free consultation!
What Steps to Take After Submitting Your App to the Play Store?
Your app is now submitted to the Google Play Store.
Good job.
But remember one thing. Submitting your app is only the first step. What you do next will decide whether people find your app or not.
Let us look at the important steps.
Promote Your App on Social Media
First, tell people about your app.
Social media can help you reach many users in a short time. Platforms like Facebook, Instagram, LinkedIn, and Pinterest allow you to share your app with a wide audience.
You can post short updates, app screenshots, or simple demo videos. Show how your app solves a problem or helps users in their daily tasks.
When people understand the value of your app, they are more likely to download it.
Use Press Releases
Now think about another idea.
What if blogs or online websites talk about your app?
This is where press releases can help. A clear press release introduces your app to journalists, bloggers, and technology websites.
This can increase visibility and bring more users to your app. More exposure can lead to more downloads.
Keep Improving Your App
Another important step is improving your app.
Users expect apps to work well without issues. If users report problems, fix the bugs as soon as possible. Release updates when needed and add useful features.
Regular updates show that your app is active and maintained.
Focus on App Store Optimization
The final step is improving your app visibility in the Play Store.
App Store Optimization helps your app appear in Play Store search results. You can improve the app title, description, keywords, and screenshots.
When your app becomes easier to find, more users may install it.
How to get your App in the Play Store's Featured Section?
Getting your app featured on the Google Play Store can help you get more visibility and downloads. There is no fixed method to get featured, but following some good practices can improve your chances.
Here are some important points to focus on:
- Follow all the rules and guidelines of the Google Play Store
- Design the app in a simple and clear way
- Fix bugs and make sure the app runs properly
- Try to get good ratings and positive reviews from users
- Write a clear app description and add quality screenshots
- Keep updating your app with improvements and new features
When your app is useful, easy to use, and well-maintained, it has a better chance of getting noticed on the Google Play Store.
Conclusion
Publishing your app on the Google Play Store helps you to show the world what you've built. With proper planning, your app can go from your screen to millions of Android users with a few clicks.
At Hashcodex, we’re more than just a mobile app development company; we’re your tech partner. We help you design, build, and launch apps that stand out, get approved fast, and reach the audience you’ve been dreaming of.
Your idea deserves to shine. Let’s launch it together and make your app a success story.